
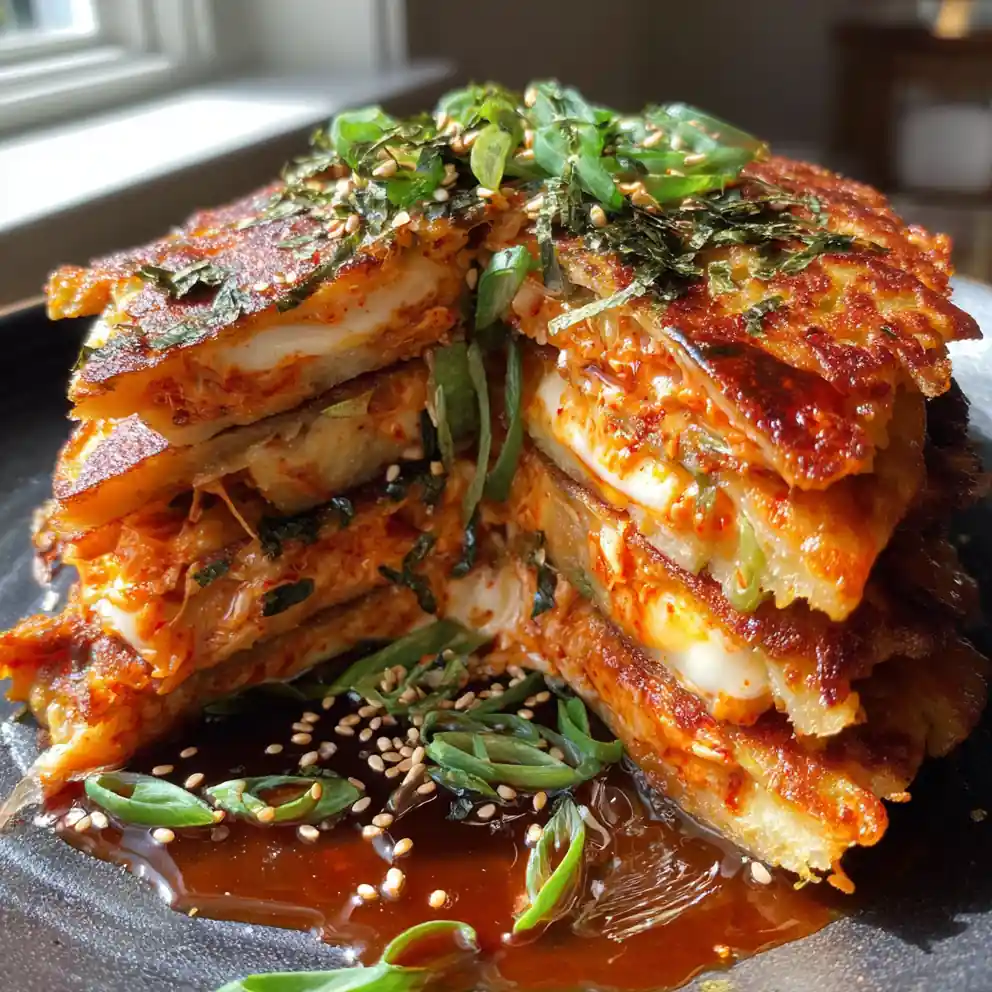
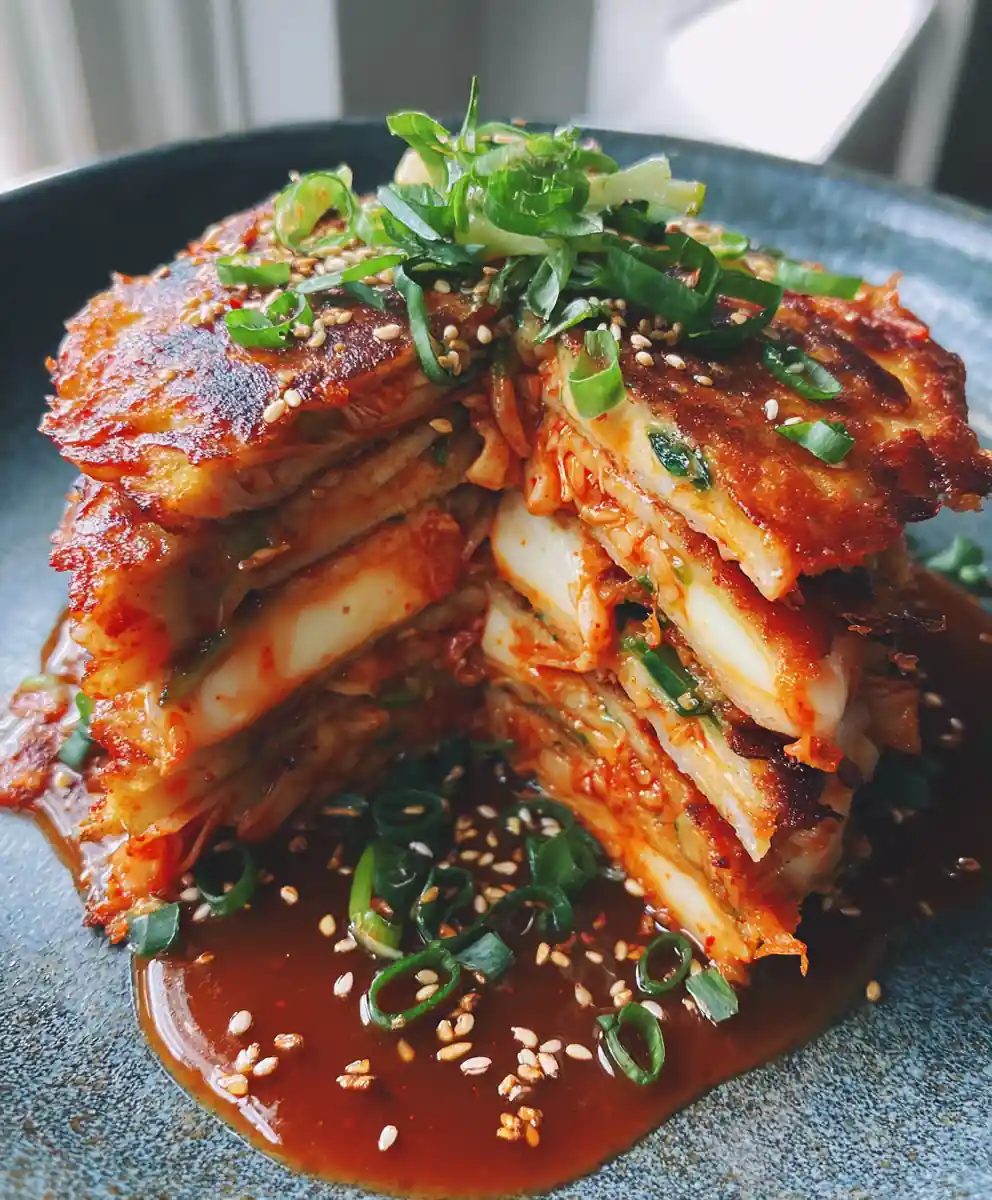
I think the best weeknight meals are those that feel like a big event, even when they take almost no effort. This easy **kimchi pancake recipe** delivers exactly that: crispy edges, savory heat, and a stunning, gooey mozzarella core that creates a truly next-level experience. We’re taking the classic Korean comfort food and making it family-friendly with this extra-cheesy twist. The combination of tangy fermented kimchi, spicy gochujang, and melted cheese inside a crispy pancake is truly next level, perfect for a quick dinner or a hearty afternoon snack when a craving hits. This specific **kimchi pancake recipe** is one of my favorite healthy eating solutions for when I’m short on time.
Ingredients
- 1 cup (240g) fermented kimchi, roughly chopped: The key to the best flavor is using sour, well-fermented kimchi, not fresh kimchi. Squeeze excess liquid from the kimchi, but reserve the brine, as it adds essential flavor and color to the batter. Roughly chop the kimchi into small pieces so it distributes evenly in the pancake.
- 1/4 cup (60ml) kimchi brine: This brine adds a crucial layer of tangy flavor to the pancake batter and helps keep the inside moist. Use the brine reserved from squeezing the kimchi in the previous step. If your kimchi isn’t very sour or doesn’t have much brine, you can add a small splash of rice vinegar as a substitute.
- 1 cup (120g) all-purpose flour: All-purpose flour gives a sturdy structure to the pancake, allowing it to hold the cheesy core without falling apart. For a slightly crispier result, you can substitute 1/4 cup of the flour with rice flour or potato starch. Avoid using self-rising flour, as the leavening agent will create a different texture.
- 1/2 cup (120ml) cold water: Cold water helps prevent gluten from developing too much when whisked, resulting in a tender rather than tough pancake. Adjust the water quantity slightly depending on how much liquid your kimchi retains; the batter should be thick, not runny. Use ice water for an extra crispy crust.
- 2 stalks green onions, thinly sliced, divided: Half of the green onions are added to the batter for a mild onion flavor, while the other half serves as a fresh garnish. Slice them thinly to ensure they cook quickly inside the pancake. The green onions add a necessary bite and visual appeal.
- 1/4 cup (30g) yellow onion, very finely diced: Finely dicing the yellow onion ensures it fully integrates into the batter and cooks down to sweetness during frying. Avoid large chunks that can prevent the pancake from cooking evenly. The onion adds another layer of aromatic depth to the savory kimchi.
- 1 teaspoon (4g) granulated sugar: Sugar balances the acidity of the fermented kimchi and rounds out the spicy heat from the gochujang. Do not omit this step, as it prevents the pancake from tasting overly sour or sharp. A small amount is all you need to achieve this balance.
- 1 tablespoon (15ml) toasted sesame oil, plus more for cooking: Toasted sesame oil adds a nutty, deep flavor to the pancake batter. It’s essential for achieving the classic Korean flavor profile. Use extra sesame oil for frying alongside the vegetable oil for added aroma.
- 1 tablespoon (15g) gochujang (Korean chili paste): Gochujang provides a sweet, spicy heat and a deep red color to the cheese core. For less heat, reduce to 1 teaspoon; for more heat, increase to 1.5 tablespoons. Ensure the gochujang is fresh and full-flavored.
- 1 cup (110g) shredded low-moisture, part-skim mozzarella cheese: Low-moisture mozzarella melts perfectly without making the pancake soggy. Avoid fresh mozzarella (packed in liquid), as it releases too much water. Part-skim mozzarella melts well while keeping the total fat content balanced.
- 2 tablespoons (30ml) vegetable oil, for frying: Use a neutral-flavored oil with a high smoke point, such as canola, grapeseed, or sunflower oil. This oil provides the necessary fat for a crispy exterior and helps prevent sticking. Be generous with the oil for a truly golden brown crust.
- Dipping Sauce Ingredients: 2 tablespoons (30ml) soy sauce, 1 tablespoon (15ml) rice vinegar, 1 teaspoon (5ml) toasted sesame oil, 1 teaspoon (3g) toasted sesame seeds: These ingredients combine to create a classic, tangy dipping sauce that cuts through the richness of the pancake. The vinegar balances the saltiness of the soy sauce, while the sesame oil adds a final aromatic note. Toasted sesame seeds add texture and visual appeal to the sauce.
Optional (plan-ahead): If you’re shopping for the week, I put this into a 4-Week Meal Plan + Grocery Lists so dinner’s already decided before your day gets busy.
Instructions
- Prepare the Batter: In a large bowl, combine the chopped kimchi, kimchi brine, all-purpose flour, cold water, half of the sliced green onions, diced yellow onion, granulated sugar, and 1 tablespoon of toasted sesame oil. Whisk thoroughly to create a cohesive batter; do not overmix, as this can make the pancake tough—some small lumps are fine. Ensure the kimchi and onions are fully incorporated so every bite has flavor.
- Prepare the Cheese Core: In a separate small bowl, combine the gochujang and shredded mozzarella cheese. Use your hands to gently mix until the gochujang is evenly distributed and coats the cheese, giving it a vibrant reddish hue. Set this mixture aside; this ensures the cheese melts evenly inside the pancake.
- Fry the First Layer: Heat 2 tablespoons of vegetable oil in a large non-stick skillet over medium heat until shimmering. Pour half of the **kimchi pancake** batter into the skillet, spreading it evenly to form a round pancake about 8-9 inches (20-23 cm) in diameter. Cook for 4-5 minutes on the first side, or until the bottom is golden brown and crispy and the edges begin to set.
- Add the Cheesy Core: Immediately sprinkle the entire gochujang-kissed mozzarella mixture over the surface of the batter, leaving a small border around the edge. Carefully pour the remaining half of the **kimchi pancake** batter over the cheese layer, spreading it gently to cover the cheese as much as possible. This layering technique keeps the cheese hidden inside, preventing it from burning on the pan. For a quick weeknight **kimchi pancake recipe** variation, I sometimes skip the layering and just mix the mozzarella directly into the batter before frying; it makes a single-layer pancake that’s ready faster.
- Flip and Finish Cooking: Carefully flip the pancake using a wide spatula. Add another tablespoon of vegetable oil around the edges of the pan if needed to ensure crispiness. Continue cooking for another 4-5 minutes on the second side, pressing down lightly with the spatula to ensure even browning and to help the cheese melt fully, until the pancake is deep golden brown and cooked through. If the pancake seems to be browning too quickly, lower the heat slightly to ensure the inner core melts before the outside burns.
- Prepare the Dipping Sauce: While the pancake cooks, prepare the dipping sauce: In a small bowl, whisk together the soy sauce, rice vinegar, 1 teaspoon toasted sesame oil, and half of the toasted sesame seeds. Taste and adjust seasoning as necessary, adding more vinegar for tang or soy sauce for saltiness. This sauce should be prepared just before serving for maximum freshness.
- Slice and Serve: Carefully transfer the cooked **kimchi pancake** to a cutting board. Let it rest for 1-2 minutes before slicing into 6-8 wedges; this prevents the cheese from flowing out too much. Drizzle a generous amount of the prepared dipping sauce over the pancake and garnish with the remaining sliced green onions and toasted sesame seeds for presentation. A truly great **kimchi pancake recipe** relies on a balance of savory and sweet.
How to Make a Crispy Kimchi Pancake (Troubleshooting Tips)
This section is crucial for achieving the perfect texture. The goal for this kimchi pancake recipe is a crispy outside and a soft, chewy inside. To achieve this, follow these tips:
- Don’t Be Afraid of Oil: Use enough oil to coat the bottom of the pan generously. This ensures the bottom of the pancake fries rather than steams, giving you that essential crunch.
- Medium Heat is Key: Frying on medium heat ensures the exterior crisps up slowly while allowing the interior (and the mozzarella core) to cook through completely. High heat will cause the outside to burn before the cheese melts inside your kimchi pancake.
- The Batter Consistency: The batter should be thick enough to hold its shape and ingredients, but not so thick that it becomes doughy. Adjust with a little water or flour if needed; it should drip off a spoon slowly.
- The Pressing Technique: When flipping the pancake, press down gently with the spatula. This promotes even browning across the surface and helps the hidden mozzarella melt fully, giving you a perfect, gooey center.
Kid-Friendly Variations and Add-Ins
To make this kimchi pancake recipe work for the whole family, here are some easy adjustments.
- Reduce the Spice: If serving to children or those sensitive to heat, omit the gochujang from the mozzarella core. You can instead mix in a small amount of ketchup or sriracha for a milder kick.
- Add Protein: For a heartier meal, add small pieces of pre-cooked shrimp or chopped mushrooms to the batter along with the kimchi. This boosts protein and makes for an even more substantial family dinner. I often add finely chopped shiitake mushrooms for a richer, umami flavor.
- Other Vegetables: Bulk up the pancake by adding other finely shredded vegetables like carrots or zucchini to the batter. Just be sure to squeeze out excess moisture from these vegetables first.
FAQs
Let’s answer some common questions about this popular kimchi pancake recipe.
What kind of kimchi should I use?
Use well-fermented, sour kimchi for the best flavor. Fresh (unfermented) kimchi does not have the necessary acidity to create the classic, tangy profile for a delicious kimchi pancake. Sour kimchi releases more flavor during cooking.
Can I use other types of cheese besides mozzarella?
While mozzarella provides the best stringy pull and melts cleanly, you can experiment with low-moisture cheeses like provolone or Monterey Jack. Avoid soft or high-moisture cheeses, as they can make the pancake soggy.
Can I make the batter ahead of time?
Yes, you can prepare the batter up to 24 hours in advance and store it in an airtight container in the refrigerator. Stir it well before using, as the flour may settle at the bottom. I personally like to make the batter in the morning and cook it fresh for an easy dinner idea.
How do I reheat leftover kimchi pancakes?
For best results, reheat the pancakes in a skillet over medium-low heat until crispy, about 2-3 minutes per side. Avoid using a microwave, as it makes the kimchi pancake soft and chewy rather than crispy.
What should I serve with kimchi pancakes?
These pancakes are often served with a simple dipping sauce (like the one provided) and can be part of a larger Korean meal, alongside rice and other side dishes. They also make a fantastic stand-alone snack or an easy dinner idea.
Why did my pancake fall apart when I flipped it?
This usually happens if the batter is too thin or if you flipped it before the first side was fully set and golden brown. Ensure the edges are firm and separated from the pan before attempting to flip this kimchi pancake.
Conclusion
This easy kimchi pancake recipe with a cheesy core is a perfect example of how simple ingredients create a truly memorable meal. The crispy edges, savory kimchi, and gooey mozzarella center make this a new family favorite for quick meals. Pin this recipe for later so you can easily find it when you need a hearty snack or easy dinner idea.
Print
kimchi pancake recipe
- Total Time: 20 minutes
- Yield: 8 wedges 1x
- Diet: General
Description
A popular Korean street food gets an upgrade with this cheesy twist. This kimchi pancake features crispy edges, savory heat, and a stunning, gooey mozzarella core, perfect for a quick dinner or hearty snack.
Ingredients
- 1 cup (240g) fermented kimchi, chopped
- 1/4 cup (60ml) kimchi brine
- 1 cup (120g) all-purpose flour
- 1/2 cup (120ml) cold water
- 2 stalks green onions, thinly sliced, divided
- 1/4 cup (30g) yellow onion, finely diced
- 1 teaspoon (4g) granulated sugar
- 1 tablespoon (15ml) toasted sesame oil
- 1 tablespoon (15g) gochujang (Korean chili paste)
- 1 cup (110g) shredded low-moisture mozzarella cheese
- 2 tablespoons (30ml) vegetable oil, plus more for frying
- 2 tablespoons (30ml) soy sauce
- 1 tablespoon (15ml) rice vinegar
- 1 teaspoon (5ml) toasted sesame oil
- 1 teaspoon (3g) toasted sesame seeds
Optional (plan-ahead): If you’re shopping for the week, I put this into a 4-Week Meal Plan + Grocery Lists so dinner’s already decided before your day gets busy.
Instructions
- Prepare Batter: In a large bowl, combine the chopped kimchi, kimchi brine, flour, cold water, half of the green onions, diced yellow onion, sugar, and 1 tablespoon of sesame oil. Whisk gently until a cohesive batter forms; avoid overmixing.
- Prepare Cheese Core: In a separate small bowl, combine the gochujang and shredded mozzarella cheese. Mix with your hands until the cheese is evenly coated in the gochujang.
- Fry First Layer: Heat 2 tablespoons of vegetable oil in a large non-stick skillet over medium heat. Pour half of the batter into the skillet, spreading it to form a round, 8-9 inch pancake. Cook for 4-5 minutes until the bottom is golden brown and crispy.
- Add Cheese and Layer: Sprinkle the entire gochujang-mozzarella mixture over the surface of the cooked batter, leaving a small border. Carefully pour the remaining batter over the cheese layer, spreading gently to fully cover the cheese.
- Flip and Finish Cooking: Carefully flip the pancake using a wide spatula. Cook for another 4-5 minutes, pressing lightly with the spatula, until the second side is deep golden brown and the cheese inside is fully melted.
- Prepare Dipping Sauce: While the pancake cooks, whisk together the soy sauce, rice vinegar, 1 teaspoon sesame oil, and half of the toasted sesame seeds in a small bowl.
- Slice and Serve: Transfer the cooked pancake to a cutting board and let it rest for 1-2 minutes. Slice into 6-8 wedges and serve with the prepared dipping sauce and a garnish of the remaining green onions and sesame seeds.
Notes
For the best flavor, use sour, well-fermented kimchi, reserving the brine for the batter. To make a crispy pancake, use enough oil in the pan and press down lightly while frying on medium heat. Low-moisture mozzarella works best for a clean melt.
- Prep Time: 10 minutes
- Cook Time: 10 minutes
- Category: Snack
- Method: Pan-fried
- Cuisine: Korean
Nutrition
- Serving Size: 1 wedge
- Calories: 280 kcal
- Sugar: 2 g
- Sodium: 400 mg
- Fat: 15 g
- Saturated Fat: 8 g
- Unsaturated Fat: 7 g
- Trans Fat: 0 g
- Carbohydrates: 25 g
- Fiber: 1 g
- Protein: 10 g
- Cholesterol: 30 mg
FREE PRINTABLE RECIPE
Get the Printable Recipe PDF (Free)
Enter your email and we’ll send you the ingredients + step-by-step instructions as a clean PDF you can save to your phone.
- ✅ Printable PDF (ingredients + steps)
- ✅ Save it to your phone (no long scrolling)
- ✅ Includes cook time + servings
- ✅ Easy to follow
FAQ
Where’s the full recipe?
It’s delivered as a printable PDF so you can save it and cook without scrolling.
I didn’t get the email.
Check Spam/Promotions and search your inbox for your site name. Then click Confirm to receive the PDF.